Version 1 (2017)
Tutorial
INDEX
REQUIREMENTS
SET UP
1. Preparation of expression data
1.1. Export of expression data from TRAM
1.2. Import of the expression data in TGCA
2. Preparation of sequences
2.1. Export of sequences from 5'_ORF_Extender
2.2. Importation of sequences in TGCA
3. Description of TGCA Table
GENERAL DEFINITIONS
4.1 File
4.2 Table
4.3 Record
4.4 Field
4.5 Layout
4.6 Browse Mode
4.7 Find Mode
4.8 Preview Mode
MENU AND COMMANDS
5.1 TGCA
5.2 File
5.3 Edit
5.4 View
5.5 Records
5.6 Scripts
5.7 Help
TROUBLESHOOTING
REQUIREMENTS
(Back to Index)
The minimum
software requirements
are:
Mac OS X 10.6, OS X Lion 10.7, OS X Mountain Lion 10.8;
Windows XP Professional, Home Edition (Service Pack 3);
Windows Vista Ultimate, Business, Home Premium (Service Pack 2);
Windows 7 Ultimate, Professional, Home Premium;
Windows 8 Standard and Pro edition.
Minimum system requirements are:
Mac OS X 10.6, Intel-based Mac CPU (Central Processing Unit), 1 GigaByte (GB) of RAM (Random Access Memory), 1024x768 or higher resolution video adapter and display.
Windows XP Professional, Home Edition (Service Pack 3), 700 MegaHertz (MHz) CPU or faster, 256 MegaBytes (MB) of RAM, 1024x768 or higher resolution video adapter and display.
A connection to the Internet
is required to display the software tutorial and to
download data for set up, but not to run the tool.
The downloaded file
should be automatically decompressed, generating a "TGCA"
folder.
Failing this, double click on the file to activate the default decompression utility of your system.
Failing this, double click on the file to activate the default decompression utility of your system.
The
TGCA Folder contains:
"TGCA" (Macintosh) or "TGCA.exe" (Windows) file
(the runtime application);
"TGCA.fmp12" (database file);
"FMP Acknowledgments.pdf" file;
"Extensions" folder, containing a "Dictionaries" folder,
with the dictionary file for supported languages;
(and an "English" folder with 3 files, for Windows);
40 ".dll" files (for Windows).
TGCA
is based on FileMaker Pro 12 (FileMaker Pro, Inc.) database management
software (www.filemaker.com/index.html),
and is
released as a FileMaker Pro 12 template, along with a runtime
application able to run "FileMaker Pro" at the core of the
software.
The runtime is freely distributed, in compliance with the license of "FileMaker Pro 12 Advanced" developer package that was used to create the program.
The runtime is freely distributed, in compliance with the license of "FileMaker Pro 12 Advanced" developer package that was used to create the program.
Standard database commands (Find, Sort, Export
records) are available within each layout of TGCA
(see "GENERAL DEFINITIONS"
and "MENU AND COMMANDS" sections in this
Guide).
Please do not change the names of any files and in the TGCA folder.
Please do not change the names of any files and in the TGCA folder.
NOTE - Be sure that
your system default format uses
"." (full stop)
as a decimal separator (English standard).
If this is not the case, you must change the system setting.
"." (full stop)
as a decimal separator (English standard).
If this is not the case, you must change the system setting.
Mac OS X: in
"System Preferences" (from the "Apple" Menu), click on
"International", then on "Formats", then choose as
"Region" a country with the English standard format for
numbers (full stop mark as a decimal separator).
System
restart or user logout is not required to make the
change effective.
Windows: in "Control Panel" (from the "Start" Menu), click on "International options" then modify the format of numbers choosing a country with the English standard format for numbers (full stop mark as a decimal separator).
System restart or user logout is not required to make the change effective.
1. Preparation of expression data
(Back to Index)
In this section, the user is guided to prepare
and import transcriptome expression data.
In order to obtain normalised
gene
expression values, the use of the TRAM (Transcriptome
Mapper) software, able
to generate and analyse transcriptome maps, is
recommended.
TRAM is freely available for download at http://apollo11.isto.unibo.it/software/.
In order to generate desired transcriptome maps, please follow the TRAM user guide.
Transcriptome maps already generated through TRAM for various human tissues are available at http://apollo11.isto.unibo.it/suppl/ (folders: 2014_Caracausi, 2014_Pelleri, 2015_Caracausi, 2016_Caracausi, for details please see the readme.html file and the corresponding publications).
Example
In order to obtain transcriptome maps from Acute Megakaryoblastic Leukemia (AMKL) in children with Down Syndrome (DS) and from normal megakaryoblasts (MK), go to the web page
http://apollo11.isto.unibo.it/suppl/2014_Pelleri/TRAM_Results/
choose "Mac" or "Win" folder depending on your operating system and download the
"DS AMKL vs. MK 500 Kb.zip" file.
After the downloaded file decompression, open the TRAM software by double-clicking on the "TRAM.app" icon and go to the "Values_A_B" software table by clicking on the button.
In order to find genes with available expression values for both conditions, click on the button of the software status
toolbar, type the "=" character in the "Ratio of
Expressions A/B" field
  , click
on "Omit" and then on "Perform Find" buttons:
Export genes and the corresponding expression values ("A" represents DS AMKL and "B" represents MK) for retrieved records choosing "Export Records..." from the "File" menu:

Choose the type "Tab-Separate Text" and name the file as preferred.
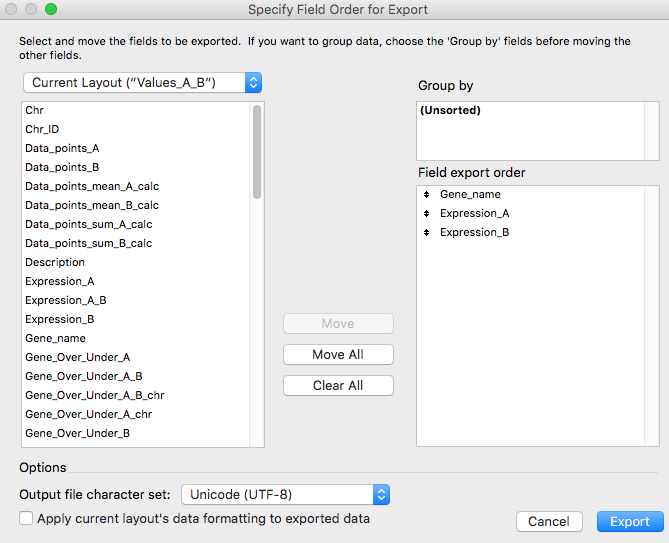
In the appearing window, select the "Gene_name", "Expression_A" and "Expression_B" fields from the left square and click on the "Move" button obtaining the situation represented in the following figure and lastly click on the "Export" button.
Alternatively, it is possible to manually create an expression data file with three columns separated by the tabulator keyboard button (TAB, ACII19): Gene symbol, Expression values for "A" condition and Expression values for "B" condition.
[Column Headers are not required]
[Gene_symbol] [Expression_A] [Expression_B]
A1BG 21.9222869109593569 41.8496039841932306
A1CF 66.1588030182621625 14.2481863184877172
A2M 30.0147695965851414 13.8910524391818214
TRAM is freely available for download at http://apollo11.isto.unibo.it/software/.
In order to generate desired transcriptome maps, please follow the TRAM user guide.
Transcriptome maps already generated through TRAM for various human tissues are available at http://apollo11.isto.unibo.it/suppl/ (folders: 2014_Caracausi, 2014_Pelleri, 2015_Caracausi, 2016_Caracausi, for details please see the readme.html file and the corresponding publications).
Example
In order to obtain transcriptome maps from Acute Megakaryoblastic Leukemia (AMKL) in children with Down Syndrome (DS) and from normal megakaryoblasts (MK), go to the web page
http://apollo11.isto.unibo.it/suppl/2014_Pelleri/TRAM_Results/
choose "Mac" or "Win" folder depending on your operating system and download the
"DS AMKL vs. MK 500 Kb.zip" file.
After the downloaded file decompression, open the TRAM software by double-clicking on the "TRAM.app" icon and go to the "Values_A_B" software table by clicking on the
In order to find genes with available expression values for both conditions, click on the

Export genes and the corresponding expression values ("A" represents DS AMKL and "B" represents MK) for retrieved records choosing "Export Records..." from the "File" menu:

Choose the type "Tab-Separate Text" and name the file as preferred.
In the appearing window, select the "Gene_name", "Expression_A" and "Expression_B" fields from the left square and click on the "Move" button obtaining the situation represented in the following figure and lastly click on the "Export" button.

Alternatively, it is possible to manually create an expression data file with three columns separated by the tabulator keyboard button (TAB, ACII19): Gene symbol, Expression values for "A" condition and Expression values for "B" condition.
[Column Headers are not required]
[Gene_symbol] [Expression_A] [Expression_B]
A1BG 21.9222869109593569 41.8496039841932306
A1CF 66.1588030182621625 14.2481863184877172
A2M 30.0147695965851414 13.8910524391818214
Open the TGCA database
and automatically import the expression data by clicking on
the green button "1. Import expression data" and choosing the file created
in the previous step.
2. Preparation of sequences
(Back to Index)
In this section, the user is guided through the preparation
and importation of mRNA sequence data.
2.1) Export of sequences
from 5'_ORF_Extender
In order to obtain mRNA sequences, the use of the 5'_ORF_Extender software, able to parse RefSeq database, is recommended.
5'_ORF_Extender is freely available for download at http://apollo11.isto.unibo.it/software/.
In order to generate updated data, please follow the 5'_ORF_Extender user guide.
Human Refseq database data already parsed through 5'_ORF_Extender are available at http://apollo11.isto.unibo.it/software/5'_ORF_Extender/5'_ORF_Extender_2.0/human/
downloading the filled version depending on your operating system.
After the downloaded file decompression, open the 5'_ORF_Extender software by double-clicking on the "5'_ORF_Extender.app" icon and go to the RefSeq_mRNA table by clicking on the button.
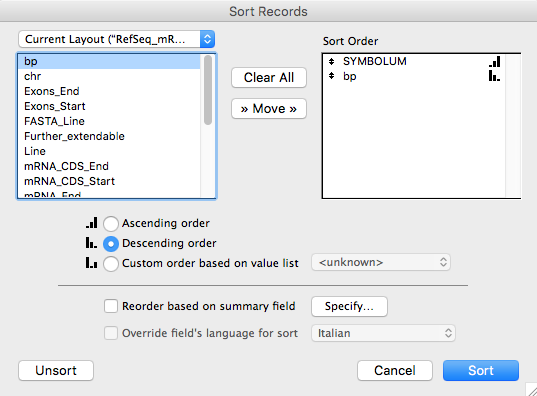
In order to export only the longest isoform for each gene, click on the button of
the software status toolbar, select the "SYMBOLUM" and "bp" fields from the left square
and click on the "Move" button (select also Descending
order for the "bp" field) obtaining the situation
represented in the following figure and lastly click on
the "Sort" button.
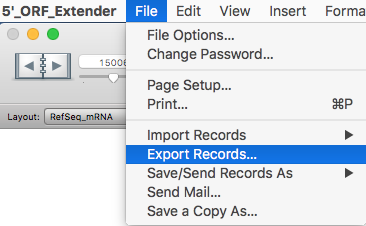
Export sequences for the longest isoforms for each gene for sorted records choosing "Export Records..." from the "File" menu:
Choose the type "Tab-Separate Text" and name the file as preferred.
In the appearing window, in the "Group by" square check both "SYMBOLUM" and "bp". Then select the "SYMBOLUM", "NM_ACCESSION", "Seq_Line" and "bp" fields from the left square and click on the "Move" button obtaining the situation represented in the following figure and lastly click on the "Export" button.
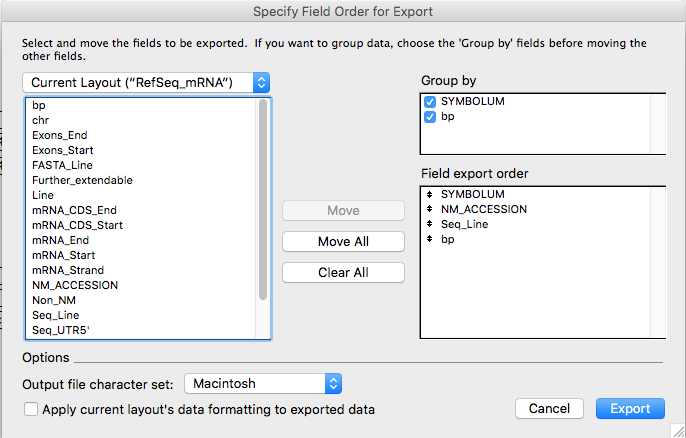
Alternatively, it is possible to manually create a data sequence file with four columns separated by the tabulator keyboard button (TAB, ACII19): Gene symbol, NM_Accession, Sequence and length.
[Column Headers are not required]
[Gene symbol] [NM_Accession] [Sequence] [Length]
A1BG NM_130786 gggcctcattgct... 1766
A1CF NM_138933 tttgatatgacga... 9364
A2M NM_000014 gcacacagagcag... 4678
... ...
2.2)
Importation
of sequences in TGCA
3.
Description of TGCA Table
(Back to Index)
FIELD DESCRIPTION
"Gene_Symbol": the gene symbol;
"NM_Accession": the mRNA RefSeq accession number;
"mRNA_sequence": the mRNA sequence;
"mRNA_GC_%": calculate the percentage of GC for each mRNA sequence
referred to its length; the mean and the standard deviation
in all the records are shown in the "GC_%_Mean" and
"GC_%_SD";
"GC_count": calculate the absolute number of GC for each mRNA sequence;
the sum of this value for all the records is available at
the bottom of the window in the yellow section;
"Expression_A": the imported expression value for each mRNA in the condition
"A";
"Expression_B": the imported expression value for each mRNA in the condition
"B";
"GC_Count_A": calculate the multiplication of each GC count for the
expression value in the condition "A" for the corresponding
mRNA; the sum of this value for all the records is available
at the bottom of the window in the yellow section;
"GC_Count_B": calculate the multiplication of each GC count for the
expression value in the condition "B" for the corresponding
mRNA; the sum of this value for all the records is available
at the bottom of the window in the yellow section;
"mRNA_Length_bp": the mRNA length in base pairs (bp); the sum of this value for
all the records is available at the bottom of the window in
the yellow section;
"mRNA_bp_x_Exp_A": calculate the multiplication of each mRNA length for its
expression value in condition "A"; the sum of this value for
all the records is available at the bottom of the window in
the yellow section;
"mRNA_bp_x_Exp_B": calculate the multiplication of each mRNA length for its
expression value in condition "B"; the sum of this value for
all the records is available at the bottom of the window in
the yellow section;
"Transcriptomic_GC_A_%": calculate the percentage of GC in the "B" transcriptome,
which is the percentage of the "GC_Count_A" sum in all the
mRNA sequences multiplied by their expression values in the
condition "B" (sum of the "mRNA_bp_x_Exp_A" values for all
records);
"Transcriptomic_GC_A_%": calculate the percentage of GC in the "B" transcriptome,
which is the percentage of the "GC_Count_B" sum in all the
mRNA sequences multiplied by their expression values in the
condition "B" (sum of the "mRNA_bp_x_Exp_B" values for all
records).
In order to obtain mRNA sequences, the use of the 5'_ORF_Extender software, able to parse RefSeq database, is recommended.
5'_ORF_Extender is freely available for download at http://apollo11.isto.unibo.it/software/.
In order to generate updated data, please follow the 5'_ORF_Extender user guide.
Human Refseq database data already parsed through 5'_ORF_Extender are available at http://apollo11.isto.unibo.it/software/5'_ORF_Extender/5'_ORF_Extender_2.0/human/
downloading the filled version depending on your operating system.
After the downloaded file decompression, open the 5'_ORF_Extender software by double-clicking on the "5'_ORF_Extender.app" icon and go to the RefSeq_mRNA table by clicking on the
In order to export only the longest isoform for each gene, click on the

Export sequences for the longest isoforms for each gene for sorted records choosing "Export Records..." from the "File" menu:

Choose the type "Tab-Separate Text" and name the file as preferred.
In the appearing window, in the "Group by" square check both "SYMBOLUM" and "bp". Then select the "SYMBOLUM", "NM_ACCESSION", "Seq_Line" and "bp" fields from the left square and click on the "Move" button obtaining the situation represented in the following figure and lastly click on the "Export" button.

Alternatively, it is possible to manually create a data sequence file with four columns separated by the tabulator keyboard button (TAB, ACII19): Gene symbol, NM_Accession, Sequence and length.
[Column Headers are not required]
[Gene symbol] [NM_Accession] [Sequence] [Length]
A1BG NM_130786 gggcctcattgct... 1766
A1CF NM_138933 tttgatatgacga... 9364
A2M NM_000014 gcacacagagcag... 4678
... ...
Open the TGCA
database and automatically import mRNA sequences by
clicking on the green button "Import sequences" and choosing the file
created in the previous step.


(Back to Index)
In
this section, TGCA fields are described.
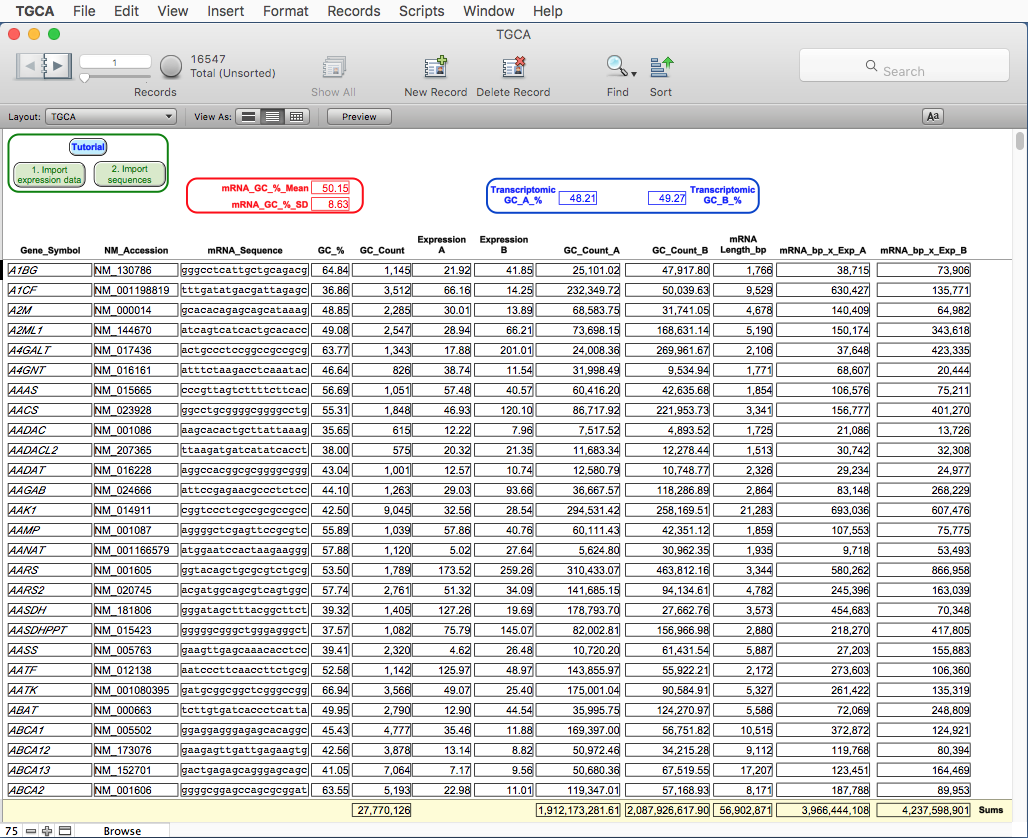

FIELD DESCRIPTION
"Gene_Symbol": the gene symbol;
"NM_Accession": the mRNA RefSeq accession number;
"mRNA_sequence": the mRNA sequence;
"mRNA_GC_%": calculate the percentage of GC for each mRNA sequence
referred to its length; the mean and the standard deviation
in all the records are shown in the "GC_%_Mean" and
"GC_%_SD";
"GC_count": calculate the absolute number of GC for each mRNA sequence;
the sum of this value for all the records is available at
the bottom of the window in the yellow section;
"Expression_A": the imported expression value for each mRNA in the condition
"A";
"Expression_B": the imported expression value for each mRNA in the condition
"B";
"GC_Count_A": calculate the multiplication of each GC count for the
expression value in the condition "A" for the corresponding
mRNA; the sum of this value for all the records is available
at the bottom of the window in the yellow section;
"GC_Count_B": calculate the multiplication of each GC count for the
expression value in the condition "B" for the corresponding
mRNA; the sum of this value for all the records is available
at the bottom of the window in the yellow section;
"mRNA_Length_bp": the mRNA length in base pairs (bp); the sum of this value for
all the records is available at the bottom of the window in
the yellow section;
"mRNA_bp_x_Exp_A": calculate the multiplication of each mRNA length for its
expression value in condition "A"; the sum of this value for
all the records is available at the bottom of the window in
the yellow section;
"mRNA_bp_x_Exp_B": calculate the multiplication of each mRNA length for its
expression value in condition "B"; the sum of this value for
all the records is available at the bottom of the window in
the yellow section;
"Transcriptomic_GC_A_%": calculate the percentage of GC in the "B" transcriptome,
which is the percentage of the "GC_Count_A" sum in all the
mRNA sequences multiplied by their expression values in the
condition "B" (sum of the "mRNA_bp_x_Exp_A" values for all
records);
"Transcriptomic_GC_A_%": calculate the percentage of GC in the "B" transcriptome,
which is the percentage of the "GC_Count_B" sum in all the
mRNA sequences multiplied by their expression values in the
condition "B" (sum of the "mRNA_bp_x_Exp_B" values for all
records).
4. GENERAL DEFINITIONS
(Back to Index)
A set of records referring to
the same subject type (e.g., the Gene_Summary
table).
One set of
fields which represents one entry (i.e. containing all requested
data for a subject, e.g. a gene probe).
The record browser is a small book icon at the top left of the window.

You may also browse the records faster using the cursor to the right of the small book icon.
The record browser is a small book icon at the top left of the window.
You may also browse the records faster using the cursor to the right of the small book icon.
A particular graphical
organization of the field of a table.
A table can be visualized in more than one layout.
A layout may display fields from a table or its related fields from other tables.
A file may show data within different layouts.
Visualization of a field is independent from the storage of the contained data.
Browsing among the layouts can be done by clicking on the 'Layout:' pop-up Menu in the upper left corner.
You may browse the database by clicking on the small book pages at the top left of the window, by using the cursor to the right of the small book icon, or by
entering a record number and clicking on the "Return" key.
The following information is constantly displayed on the Status toolbar (if not, select "Status Toolbar" from the "View" Menu):
Records: total number of Records in the table.
Found: total number of the subset of Records currently selected. Clicking on the green circular button will retrieve the complementary subset of currently omitted records.
Sorted: sorting status of the Records (Sorted/Unsorted).
The FileMaker Pro-based database may be used basically in these "modes":
'Browse', 'Find', and 'Preview'.
Switching between different modes can be done from the 'View' Menu or from the pop-up Menu bar at the bottom left of the window.
It allows entry, viewing, browsing,
sorting, and manipulation of data.
It may be selected from
the 'View' menu or
the pop-up mode Menu bar at the bottom left of the window.
It may be selected from
the 'View' menu or
the pop-up mode Menu bar at the bottom left of the window.
In the 'Browse' mode, the
record sets can be browsed by clicking on the small book icon (with the arrows
to move 'back' and 'forward') in the upper left corner.
Browsing among the tables can
be done by clicking on the 'Layout:' pop-up Menu in the upper
left corner.
An
alternative mode for using the database.
It allows you to search for specific content in the database fields, using any different combination of criteria
(see the 'Find mode' section below for more details).
It may be selected from
the 'View' menu,
the mode pop-up Menu bar at the bottom left of the window or
the button.
The user can fill in a blank form allowing to searches in specific fields.
In the "Find" mode, the small book icon in the upper left corner represents different "requests" that are made for searching the database.
In FileMaker Pro 'Find' mode, the "AND" - "OR" - "NOT" operators may be implemented in this way:
"AND" by filling criteria in different fields
located in the same "Request",
"OR" by generating additional requests
(from the "Requests" Menu) in the same query,
"NOT" by generating additional requests
(from the "Requests" Menu) and clicking on the "Omit"
button (located on the top bar in the window).
The 'Operators' pop-up Menu appears by clicking on a field while pressing the 'ctrl' key, allowing the query of:
exact matches, duplicate values, ranges, wild cards and more.
Click on the 'Perform Find' button at the top of the window to start the query.
The result of the search is the subset of the entries matching the set search criteria.
Tips:
- we recommend using the "=" symbol followed by the gene symbol; for example using the search "=FAS" in the Gene_Symbol field will retrieve the gene FAS and the antisense FAS-AS1;
- in order to search for records with an empty field, use the "=" symbol not followed by anything in the desired field.
4.8 Preview Mode
It allows you to search for specific content in the database fields, using any different combination of criteria
(see the 'Find mode' section below for more details).
It may be selected from
the 'View' menu,
the mode pop-up Menu bar at the bottom left of the window or
the
The user can fill in a blank form allowing to searches in specific fields.
In the "Find" mode, the small book icon in the upper left corner represents different "requests" that are made for searching the database.
In FileMaker Pro 'Find' mode, the "AND" - "OR" - "NOT" operators may be implemented in this way:
"AND" by filling criteria in different fields
located in the same "Request",
"OR" by generating additional requests
(from the "Requests" Menu) in the same query,
"NOT" by generating additional requests
(from the "Requests" Menu) and clicking on the "Omit"
button (located on the top bar in the window).
The 'Operators' pop-up Menu appears by clicking on a field while pressing the 'ctrl' key, allowing the query of:
exact matches, duplicate values, ranges, wild cards and more.
Click on the 'Perform Find' button at the top of the window to start the query.
The result of the search is the subset of the entries matching the set search criteria.
Tips:
- we recommend using the "=" symbol followed by the gene symbol; for example using the search "=FAS" in the Gene_Symbol field will retrieve the gene FAS and the antisense FAS-AS1;
- in order to search for records with an empty field, use the "=" symbol not followed by anything in the desired field.
4.8 Preview Mode
An alternative way of
using the database.
It visualizes a print preview of the found records.
It may be selected from
the "View" menu
or the pop-up Menu bar at the bottom left of the window.
In the "Preview" mode, the user can obtain a print preview of the data in the current table.
Browsing among the tables can be done by clicking on the 'Layout:' pop-up Menu in the upper left corner.
About
FileMaker Pro Runtime...
Information about FileMaker Pro Runtime at the core of the software.
Preferences...
Standard preferences panel; cache memory size can be set at up to 256 Mb.
Hide TGCA
Hides all TGCA windows.
Quit TGCA
Closes the programme.
Information about FileMaker Pro Runtime at the core of the software.
Preferences...
Standard preferences panel; cache memory size can be set at up to 256 Mb.
Hide TGCA
Hides all TGCA windows.
Quit TGCA
Closes the programme.
File
Options...
It is only possible to set the "Spelling" options.
Change Password...
There is no default password set.
Page Setup...
Standard page set up command.
Print...
Standard print command.
The appearance will match the layout currently displayed on the screen.
Import Records
This is the general "Import" function of FileMaker Pro.
Export Records...
Export command for the found records set in a
given table.
Records are exported in their current sorting mode.
User can select fields to be exported, their relative order,
and the separation character.
Records are exported in their current sorting mode.
User can select fields to be exported, their relative order,
and the separation character.
Save/Send Records As...
Saves records to a specified Excel worksheet.
Send
Sends an intranet or internet email message (with or without a file attachment) to one or more recipients.
Email can be sent through an email application or via SMTP (Simple Mail Transfer Protocol, a set of criteria for sending and receiving email).
Save a Copy as...
Save a copy of the database, compacted,
compressed, as
a clone (database structure with no record present) or as a
self-contained copy.
5.3 'Edit' Menu
(Back to Index)
Undo
Standard "Undo" command.
Redo
Standard "Redo" command.
Cut
Standard "Cut" text command.
Copy
Standard "Copy" text command.
Paste
Standard "Paste" command.
Paste Text Only
Standard "Paste" text command.
Clear
Deletes the contents of the specified field in the current record.
Select all
Selection of all text present within a selected field
(to select a field, click on the field).
Find/Replace
Utility for searching/replacing text strings within fields.
Note: Use 'Find' mode (from the "View" Menu) for full search and selection of a record set.
Spelling
Function for checking spelling of text strings within fields.
Export Field Contents...
Function for exporting the contents of the selected field to a file.
5.4 'View' Menu
(Back to Index)
Browse
Mode
Switch to the 'Browse Mode' (see "General Definitions" above).
Find Mode
Switch to the 'Find Mode' (see "General Definitions" above).
Preview Mode
Switch to the 'Preview Mode' (see "General Definitions" above).
Go to layout
A possible way to switch between different layouts.
View as Form
A possible way to individually display the current record of a found set of records.
View as List
A possible way to display all the records of a found set in the form of a list.
View as Table
A possible way to display all the records of a found set in the form of a spreadsheet-like table.
Status Toolbar
To switch on/off the "Status Toolbar": the toolbar located at the top of the programme window.
Customize Status Toolbar
To customize the "Status Toolbar" buttons.
Formatting bar
To switch on/off the "Formatting Toolbar".
Ruler
To switch on/off the text ruler of the application.
Zoom in
Used to increase layout dimensions.
Zoom out
Used to decrease layout dimensions.
5.5 'Records' Menu
(Back to Index)
New Record
Creates a new empty record in the database.
The new Record will be the latest in the current record set.
Duplicate Record
Duplicates the current record in the database.
The new Record will be the latest in the current record set.
Delete All Records
Deletes all the records in the database.
Delete Found Records...
Deletes all currently found records in the database.
Go to Record
Moves to the selected record by number, previous or next.
Refresh Window
Updates the entire contents of the database window, including any related records.
Show All Records
Shows all the records in the database.
Show Omitted Only
Shows all the records in the database not included in the current found set.
Omit Record
Removes the selected record out of the current found set, without deleting it.
Omit Multiple...
Removes more than one record, selected by numbers, out of the current found set, without deleting them.
Modify Last Find
Returns to the last performed search in order to edit it.
Saved Finds
Saves a set of search criteria.
Sort Records...
Sorts the current record set according to desired criteria.
In the Sort Records dialog box, from the left square choose the desired table fields available for sorting in the order you want them sorted and click on the "Move" button. Clicking on the "Clear" button will delete previously chosen fields. By default, the records remain sorted until you perform a find or sort records by different criteria.
This function is available also clicking on the
Unsort
Displays the current record set according to the order of creation of each record.
Replace Field Contents...
Replaces the value of a field in all sets of records found with the value specified in the current record, or by calculation.
Relookup Field Contents
This
command updates the value of a field by reading the matched
value in a related table (the relationship has been
established during database development using a 'key'
field).
Revert Record...
Restores the value of a field, discarding any change, before clicking out of that field.
5.6 'Scripts' Menu
(Back to Index)
Tutorial
The
page with the TGCA tutorial.
Import_Expression_Data
Please see section 1.2.
Import_Sequences
Please see section 2.2.
5.7 'Help' Menu
(Back to Index)
Search
Search a 'Help' system for the general commands.
Import_Expression_Data
Please see section 1.2.
Import_Sequences
Please see section 2.2.
5.7 'Help' Menu
(Back to Index)
Search
Search a 'Help' system for the general commands.
TROUBLESHOOTING (Back to Index)
Sometimes,
power failure, hardware problems, or other factors can
damage a
FileMaker Pro database file.
When the runtime application discovers a damaged file, a dialog box appears, prompting the user to contact the creator.
Even if the dialogue box does not appear, files can exhibit erratic behaviour.
If you have FileMaker Pro or FileMaker Pro Advanced installed you can recover them using the 'Recover' command.
Otherwise, to recover a damaged file:
- On Mac OS X machines, press Command + Option (cmd-alt) while double-clicking the runtime application icon. Hold the keys down until you see the 'Open Damaged File' dialogue box.
- On Windows machines, press Ctrl+Shift while double-clicking the runtime application icon. Hold the keys down until you see the Open Damaged File dialogue box.
During the recovery process, the runtime application:
1. Creates a new file;
2. Renames any damaged files
by adding “Old” to the end of the
file name;
file name;
3.
Gives the repaired file the original name.